
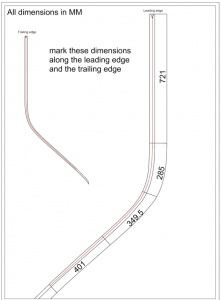
Daggerboard Templates
As in all foiling boats, the daggerboards are the most critical technical element of the boat. Even though the Nacra 17 follows a manufacture production one-design concept, the class has introduced enhanced oversight on daggerboards.
Sailors must only use daggerboards supplied by Nacra Sailing, and cannot modify the boards in any way. If repairs are necessary, a request to measurement@nacra17.org must be made including the materials and process that might be used.
Sailors, with permission from measurement@nacra17.org, may repaint their foils using any of the approved paints. The event inspectors will also have tooling at regattas to ensure that sailors are all racing with daggerboards that are of the same shapes and sizes, and that have not been modified.
To help sailors ensure their boards remain as built and designed, sailors may purchase replica’s of the IM tooling via the class store. These replicas are manufactured using a water jet cutting, which is cheaper but less accurate than the IM’s CNC’d tooling. Therefore, they are not official measurement equipment.
Sailors should endeavor to race only with boards that closely fit the templates, to ensure they do not fall outside the limits the IM’s will establish.
Here is a list of the equipment sailors should have at their disposal:
- Set of daggerboard templates
- ‘Feeler gauges’ (thickness of .1mm, .15mm, .2mm, .25mm, and .35mm are all that is needed)
- A digital caliper
- A marked rope to determine the locations of each station
- A grease pencil to mark the station locations in partnership with the rope
Here is a diagram of the stations where the templates
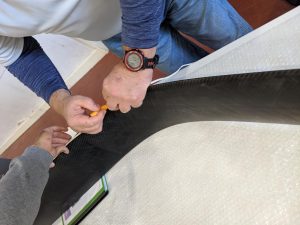
 Here is a photo for how to mark the stations.
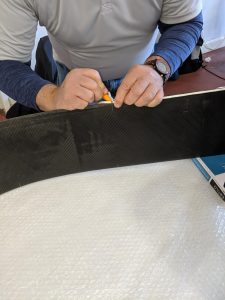
Procedure for Using the templates
It takes two people to use the templates properly. Lay the board on a flat surface and mark the station locations. Put the appropriate template at the appropriate station.
Then measure the board curve first on one side but having the person holding the template push it firmly against the side of the board. Then the second person uses the feeler gauges to see what the largest gap between the template and the board is. Start with a thin feeler gauge, and then gradually increase the size of the feeler gauge until you get to one that does not fit through. We have been recording the size of the largest size that does fit through.
Then repeat the procedure but put the pressure on the template to the other side of the board.
Finally, with the template fully closed, use the calipers to establish the largest amount of space between the overall template and the boards. This establishes how thin the boards are relative to the templates.
Here is the class report produced after measurement in Palma. As the IM group begins using their CNC’d templates guidelines and limits will be established.